This is a follow-up to the previous post, which covered several types of photo editing software. This part of the tutorial will focus on how to open an image, scale it to the correct size for printing, and save the file.
If you don't already have photo editing software, a 30-day trial version of Adobe Photoshop Elements 8 is free to download. A Mac version of the software is also available.
We will be working with a poster from the Chicago World's Fair that is in the public domain. If you'd like to follow along with this tutorial, you may wish to download the poster image and save it to your desktop.
Step 1
Open Adobe Photoshop Elements. A dialog box will appear. Choose "Start from scratch". When the next dialog box appears, click "Cancel". From the menu at the top of the screen, choose File — Open and locate "poster.jpg" on your desktop. Your screen will look something like this:
Step 2
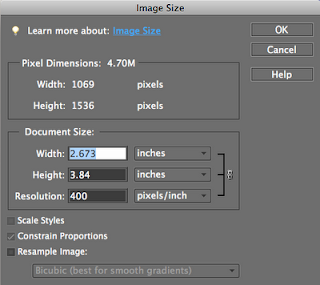
We will resize the poster. From the menu at the top of your screen, choose Image — Resize — Image Size (Note: this window is the place to find out the sizes of the images you are working with.) You will see the current size of 2.673 inches wide with a resolution of 400 pixels per inch. We want to make it smaller: 1.75 inches wide with a resolution of 300 pixels per inch. It's possible to resize images here, but I'll show you an easier way in a moment.
At this point, understanding a little bit about resolution will come in handy. Here is a basic introduction:
Resolution = the number of pixels (tiny squares of color) per inch/cm in your image. The higher the resolution, the more pixels your image contains, and the better the quality of your picture. If you've seen fuzzy images that look like the edges of the colors are "pixelated", it is probably because the image has a low resolution. So, what is the ideal resolution to keep your images from being fuzzy? For printing purposes, 300 pixels per inch is ideal. Higher than 300 pixels is unnecessary because the difference is almost imperceptible to the human eye. For images on websites, 72 pixels per inch are ideal because most computer screens are unable to show more than 72 pixels per inch.
When thinking about the size of an image, keep in mind the resolution that you have to work with. The resolution will dictate how big the final image can be.
A tip about resolution: Images can always be made smaller, but never made larger. In other words, resolution can not be added. if you find a picture on the web that is 2 inches wide with a resolution of 72 pixels per inch, it can not be enlarged to 2 inches wide with a resolution of 300 pixels per inch without the picture becoming fuzzy. To make up the difference in pixels and resolution, image editing software adds extra pixels into the picture. This is what causes the fuzzy appearance.
Keeping resolution in mind, we want our World's Fair poster to be 1.75 inches wide with a resolution of 300 pixels per inch.
From the tool bar to the left of your image, choose the crop tool (the 10th tool from the top). Look at the gray bar above the poster that says, "Aspect Ratio", "Width", "Height", etc. The Aspect Ratio should be set to "Custom". Enter "1.75 in" into the Width box. Keep the Height box empty. Enter "300" into the Resolution box.
Click and drag a box over your image. Everything outside of the "marching ants" will be cropped. When you're satisfied with your crop, let go of the corner and double-click on the image or press "Enter". Your poster will now be 1.75 inches wide with a resolution of 300 pixels per inch.
Step 3
To save your image, go to File — Save As. Name your poster and specify the location for it to be saved. If you choose to save your poster as a jpeg and you want to print it, make sure that you choose the "Maximum" or "12" quality in the dialog box. That's it!
The next part of this tutorial will cover using layers to create a composite image.
If you have questions about this post or suggestions for future topics, please leave a comment.
Subscribe to:
Post Comments (Atom)


.jpg)


Thanks for taking the time to do this Carol. I think that I'll probably print it all off and sit down with it when I get the chance to make the best use of a 30 day trial.
ReplyDeleteThanks Carol. I'd like to have more inspiration from you!
ReplyDelete