Create a "rubber stamp" look from clip art using Photoshop Elements. This customizable design is perfect for signs, pillows/upholstery, bags, etc. (Thank you to Norma at Make Mine Mini for suggesting this idea).
Let's Begin
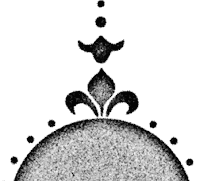
Download the clipart and save it to your desktop. Open the file in Photoshop Elements.
The artwork that has been provided is meant for you to customize. The examples above show a couple of ways to embellish the artwork. If you would like to add a monogram, text or another graphic to the middle of the circle, now is the time to do so. If you are not familiar with combining two images into one, please see
Part 3 of the Photoshop Tutorial.
Note: You will want to work with an image that has only one layer, so if you have placed another graphic or text into your document, you will need to flatten the layers into a single layer.
Using the magic wand tool (the 7th tool from the top of your toolbox on the left side of your screen), you will select all of the black areas in the design. To do this, click on the magic wand tool. At the top of your screen, change "Tolerance" to "10". Make sure that the "Contiguous" box is unchecked. Now, click once in the black area of the design. Marching ants will appear around all of the black areas of the design to show you that they are selected.
You will apply a filter to “eat away” the insides of the design. Go to
Filter - Other - High Pass. Play a bit with the slider. For the example I set the Radius to 10 pixels and applied it
twice.
To achieve a “grainy” texture, go to
Filter - Noise - Add Noise. Click on "Gaussian" and "Monochromatic" and set the slider to an amount of 15. Click OK.
Your design will look like this:
From the menu at the top of the screen, choose
Select - Deselect.
Now we'll make it even more pixelated by increasing the resolution. From the menu at the top of your screen, choose
Image - Resize - Image Size. Click on the "Resample Image" box at the bottom. Change the resolution from 72 to 144.
To mask the remaining bitmapped areas, we'll
Diffuse the image. From the menu at the top of your screen, choose
Filter - Stylize - Diffuse.
Increase the resolution again. From the menu at the top of your screen, choose
Image - Image size Resample image. Change the resolution from 144 to 288.
To remove the tiny pixels created by the Diffuse filter
, we'll apply a
Gaussian blur of 1 pixel. From the menu at the top of your screen, choose
Filter - Blur - Gaussian Blur. The Radius slider should be set to 1.0.
Increase the
Brightness and Contrast until you reach the desired amount of “inking”.
(Enhance - Adjustment Lighting - Brightness/Contrast. Contrast brings out the texture. I set both sliders to +50.
Your design will look like this:
The High Pass filter we applied at the very beginning primarily affects areas with substantial volume (the middle of the large circle). Therefore you may wish to do a partial selection of the border of our design and apply a higher amount of contrast to bring out more noise. From the toolbox on the left side of your screen, choose the lasso tool (the 6th tool from the top). Click and drag around the edges of the design. To add to the area that you are selecting, hold down the shift key and click and drag again. If you look closely at the example below, you'll notice that everything except the middle of the large circle is selected.
From the menu at the top of the screen, once again choose
Enhance - Adjustment Lighting - Brightness/Contrast. Set the contrast slider to +75.
From the menu at the top of the screen, choose
Select - Deselect.
Prepare the image for conversion to a bitmap image
Filter - Adjustments - Treshold. You may wish to play a bit with the slider until you reach the desired amount of “inking”. I set the slider to 96.
That's it! Your image will have a "stamped" look like this:
Changing the Color
Your graphic is set to print in black and white. If you 'd like to change it to another color, follow these simple directions:
- From the menu at the top of the screen, choose Image - Mode - RGB Color.
- On the right side of your screen, you'll see the Layers palette. At the bottom of the Layers palette, there is a row of icons. Note the circular icon that is half black and half white. Click on this icon to create a new adjustment layer. When you click, a drop down menu will appear. Click on Hue/Saturation.
- Below the Layers palette, you'll notice that the Adjustments palette now shows rainbow sliders. Below the sliders, click on the box that says "Colorize."
- Move the "Lightness" slider to the right. You'll notice that the color of your design will change from black to brown. The more you move the Lightness slider, the lighter the brown will become.
- Play around with the sliders until you are satisfied with the color.
Printing
Your final graphic is 3.2 inches wide x 6.5 inches tall. You may wish to make this smaller for printing. From the toolbox on the left side of your screen, choose the crop tool (the 10th tool from the top). On the menu above your design, type in the Width or Height to your desired size (choose only one). Type "300" into the box that says "Resolution". Click and drag the crop tool over your design. When you are satisfied with the crop, click on the green X that appears at the lower right corner of the selection.
Making it your own
You may wish to add a monogram, text or another graphic in the middle of the circle like the examples at the beginning of this post. If so, just make sure that you add your text or graphic before you begin the rubber stamp tutorial so that everything has the same stamped appearance.
The graphic used in this tutorial has been designed by me and is copyright free. You may use it however you wish.
Feel free to post questions about this tutorial or suggestions for future Photoshop tutorials.
If you would like to learn more about using Photoshop, please see my earlier Photoshop posts or visit lynda.com for video tutorials.